
HC4201TA
LCD Thermostat (HC4201TA)
HC4201TA series of LCD thermostat with a high voltage
version (100~240VAC) and a low voltage version (12VDC). It is used for Fan-Coil control (FCU) either for two-wires or 3-wires valve control. Its large LCD screen with internal sensor monitors indoor temperature and automatically control the cooling/heating to maintain the temperature desired.
Features:
- Low profile mounting either in single-gang frame or part of
multi-gang frame (Infinit series: 2,3,4 or 5-gang frame). - Large screen LCD with good visual effect, low reflection and slim.
- touch screen operation with back light.
- Touch screen feedback with beep sound (can be muted).
- RS-485 communication port, MODBUS protocol (optional).
- Function status display on LCD screen.
- Temperature compensation (±5 ℃).
- Auto Off with timer control.
- Data retention after power failure .
- Energy saving or Eco mode.
List of model no.
(a) High voltage (100-240VAC)
| Model no. | Cooling/fan | Heating | Dry | RS 485 |
| HC4201TA-00 | √ | |||
| HC4201TA-00M | √ | √ (Isolated) | ||
| HC4201TA-02 | √ | √ | ||
| HC4201TA-02M | √ | √ | √ (Isolated) |
(b) Low voltage (12VDC)
| Model no. | Cooling/fan | Heating | Dry | RS 485 |
| HC4201TA-92M | √ | √ | √ (Isolated) |
Technical Data:
(a) LCD display & button |
||
| Screen type: | segmented black/white LCD | |
| Screen size: | 64x62 mm | |
| Font color: | White | |
| Background color: | black | |
| Back light: | Yes | |
| Button type: | capacitive | |
(b) air-con control |
||
| Preset temperature range: | 16℃ - 35℃ | |
| Built-in temperature sensor: | NTC | |
| Temperature precision: | +/- 1℃ | |
| Temperature compensation: | from -5℃ to +5℃ | |
| Temperature control hysteresis: | 2℃ | |
| air-con mode: | cooling, fan, heating, eco (depended on product model) | |
| fan-speed mode: | low, mid, high, auto | |
| Timer: | ||
| - function | turn off thermostat when time is up | |
| - range | 30 min to 23.5 hr in step of 30 min | |
(c) Configurable controls |
||
| When fan speed is in AUTO mode, fan will stop when room temp. reach preset temp. | Default is disabled. (I.e. the fan will be in low speed when condition meet.) | |
| Modbus station number | Default is 3 | |
(d) Electrical |
||
| High voltage | Low voltage | |
| Supply voltage: | 100-240VAC 50/60Hz | 12VDC |
| Power dissipation: | < 1.2W | < 0.3W |
| Relay for valve control: | ||
| - rated current: | < 2A | not applicable |
| - type | Form C | not applicable |
| - number | 1 or 2 depended on product model | not applicable |
| Relay for fan speed control: | ||
| - rated current | < 2A | not applicable |
| - type | Form A | not applicable |
| - number | 3 | not applicable |
| RS485 port: | optional | Yes |
| modbus setting: | default: 9600,8,N,2 (station no: 3) | |
| Compatible with B32 controller | not applicable | Yes |
| Compatible with B33 controller | not applicable | Yes |
| Terminal screw type: | M2.5 | M2 |
| Number of terminal: | 13 | 7 |
| Cable size: | 22-14 AWG (0.6 - 1.6 mm) |
24-16 AWG (0.5 - 1.2 mm) |
(e) Mechanical |
||
| Operating temperature: | 0~50℃ | |
| Dimension: | 86x86 mm | |
| Depth: | 33 mm (high voltage) 23 mm (low voltage) |
|
| Depth for wall box: | > 35mm | |
| Fix Center: | 60.3mm | |
| Fix screw: | M3.5 x 30 mm | |
| relative humidity: (non-condensing) |
0-90%RH | |
| IP rating: | 4X | |
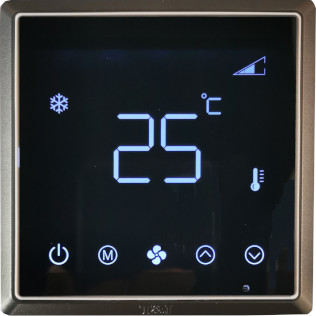
Panel
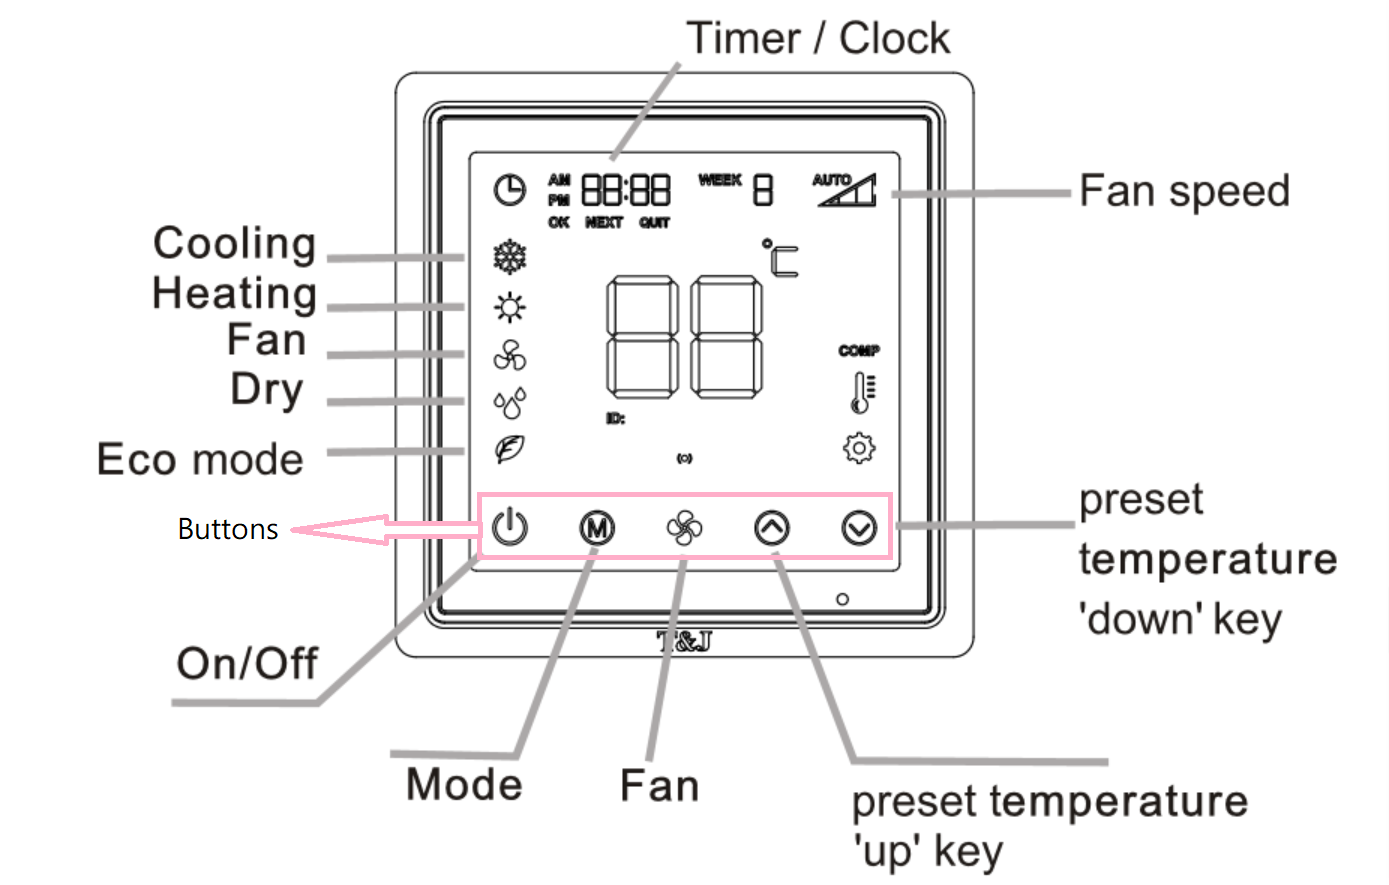
Operation instruction
| On/off key | Press |
|
| Mode key | Press cooling |
|
Eco mode
|
||
| Fan key | press ’low' --'medium' --'high' -- 'auto' |
|
| Up key | press |
|
| down key | press |
Setting on thermostat
(a) Timer function
- Long press
 for 5 seconds to enter set-up menu when thermostat is turned on.
 - Timer format: XX(hour:minute).
it will blink during setting. - To set the timer by pressing
 and
and  key, each press will increase or decrease by 30 min.
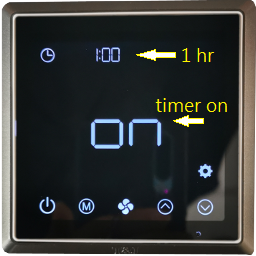
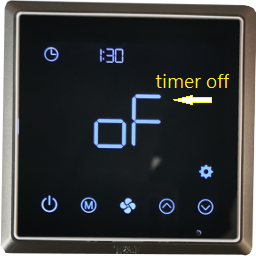
press to finish. - press or to enable / disable timer function.
'on' indicate "ON", 'oF' indicate "OFF" - press to finish timer setting
- Illustration: timer is enabled with 1hr setting
- Illustration: timer is disabled
(b) Set up modbus number
- press
 to turn off thermostat.
 - Long press
 for 5 seconds.
 - press and to set modbus number
- press to confirm and save setting..
(c) Set up temperature compensation
- press to turn off thermostat.
- Long press for 5 seconds
- press and to set temperature compensation. (range from -5℃ to +5℃)
- press to confirm and save setting.
(d) Enable / Disable "Fan Off when room temperature reach preset temperature"
- press to turn off thermostat.
- Long press for 5 seconds
- press and to enable / disable this function
- 'on' indicate "ON", 'oF' indicate "OFF"
- press to confirm and save setting.
(e) Enable / Disable beep sound
- press to turn off thermostat.
- Long press for 5 seconds
- press and to enable / disable this function
- 'on' indicate "ON", 'oF' indicate "OFF"
- press to confirm and save setting.
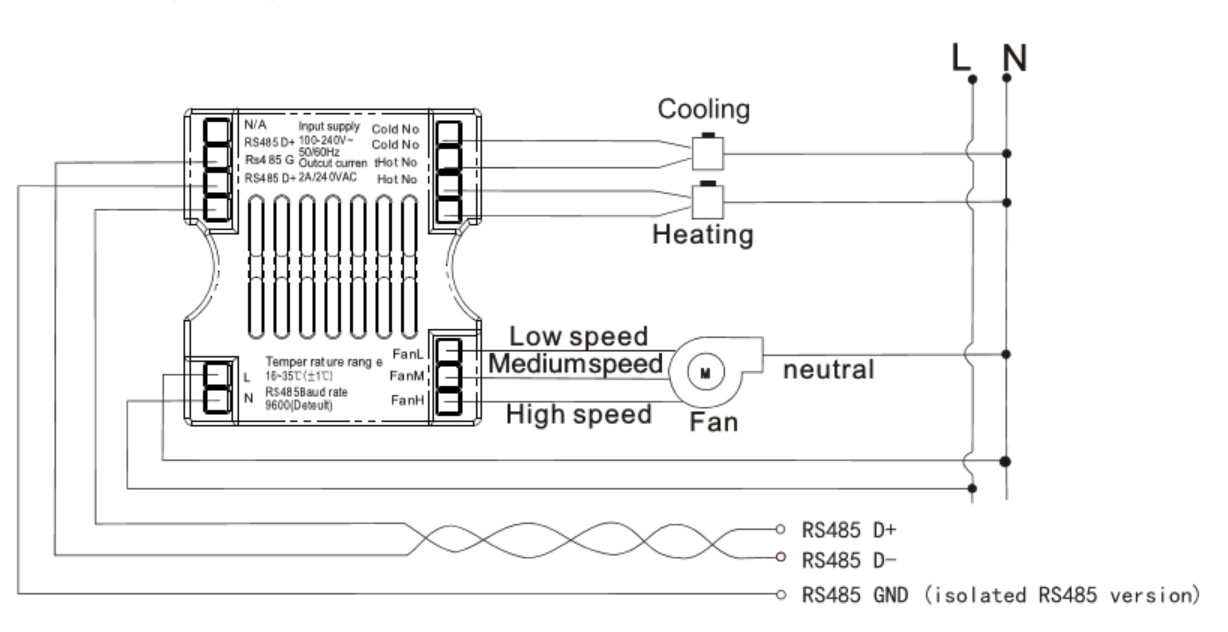
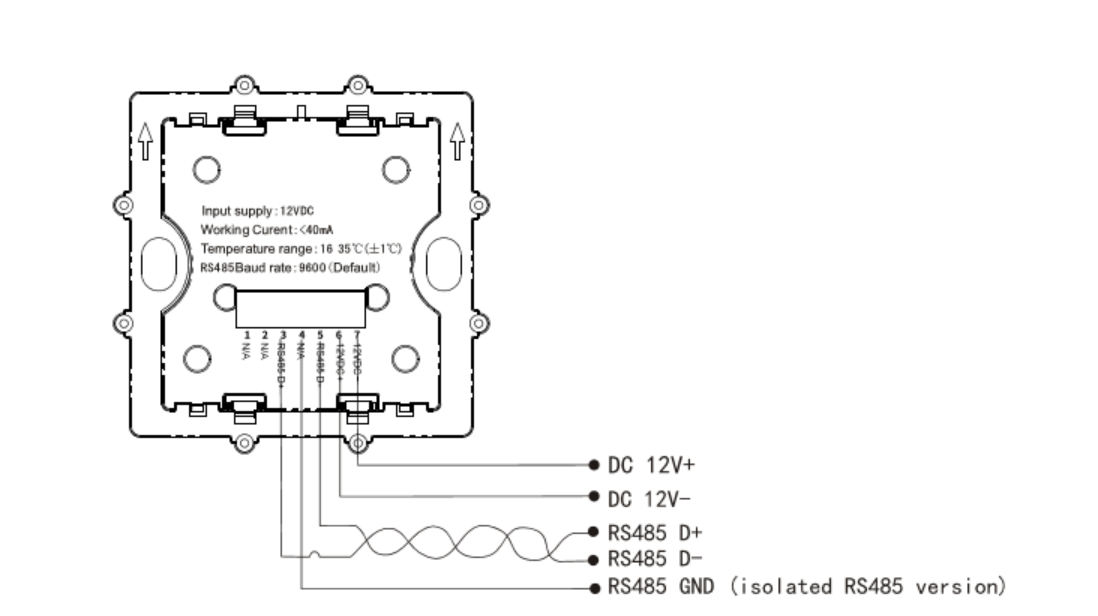
Wiring diagram
(a) High voltage version
(b) Low voltage version
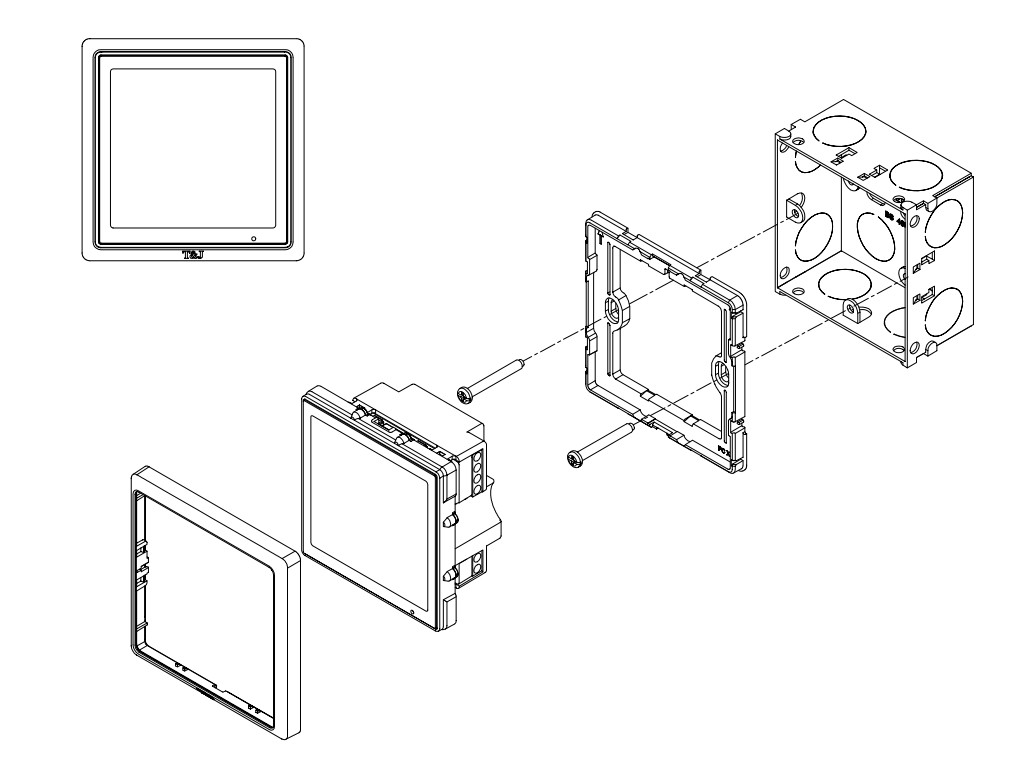
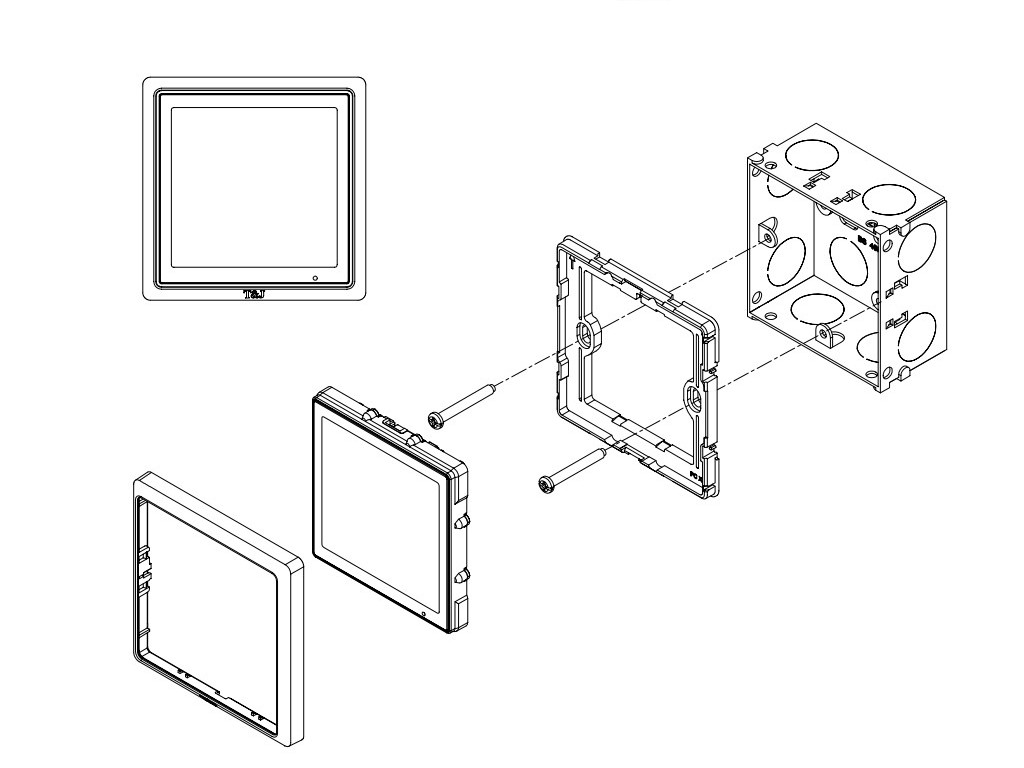
Installation illustration
(a) High voltage version
(b) Low voltage version
Precautions on installation
- Please make sure the thermostat is powered off during installation or maintenance.
- Do not knock on the thermostat during installation and ensure the the mounting surface is flat.
- Do not press on the LCD screen or the sides of the screen which may cause the display screen to break or crack.
- Please wire according to the wiring diagram, otherwise it may cause damage to the thermostat.
- Please use the screws provided, otherwise warranty might be voided.